Preparation
Keep this guide handy to ensure everything is done quickly. You will need:
A USB cable that comes with the camera
Occasionally, issues arise from using a low-quality cable. It’s best to use the one included with the camera. If unavailable, choose the highest quality cable you have 🙂. For newer models, it will likely be USB Type-C, which is compatible with Android phone cables.
A computer:
- Windows 10 or higher (preferred)
- macOS Monterey, macOS Ventura, or newer
If you don’t have access to a suitable computer, you can visit the nearest computer club.
A stable internet connection
The camera should be charged to at least 20%
No memory card is required
If you decide to postpone the procedure, bookmark this page ❤️ and follow our VK group.
I’m usually available from 02:00 to 15:00 GMT time and can perform the procedure immediately upon request. We can also schedule a convenient time in advance.
Procedure Steps
Download the Anydesk program for remote access. Registration is not required.
If you are using macOS, you will need to grant additional permissions. Watch the video below for guidance:
Launch the Anydesk program.
I will remotely control your computer, so it’s easier if we maintain communication via your phone using a messenger.
Provide me with the numerical ID of your computer, which consists of 9 digits:

I will then connect to your computer. Accept the connection request. Make sure to click the button with the shield icon. This is important!

While I set up the necessary programs on your computer, connect your camera:
Turn off the camera.
Connect the camera to the computer using the USB cable that came with it.
Turn on the camera.
If this is the first time using the camera and you haven’t selected a language yet, do so. Follow the prompts to select a time zone and navigate through the dialogs.
When prompted to choose a USB connection mode, select Mass Storage (also known as Image Transfer, MSC, or Storage Mode) and confirm with OK.
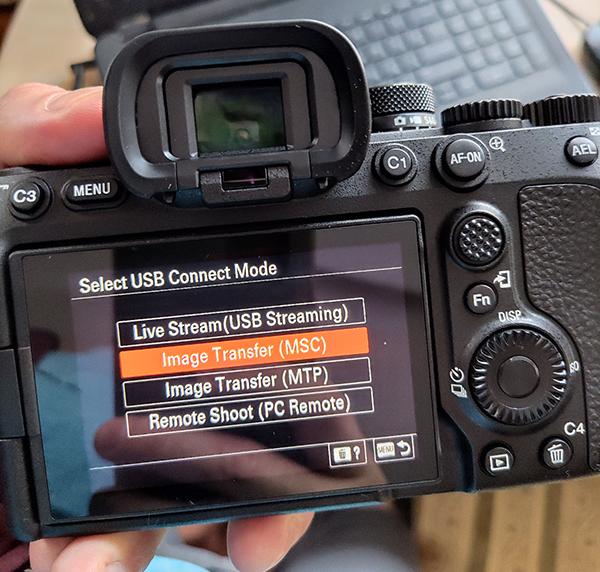

Send me a photo of the camera screen through our chat.
The camera screen should show that it is connected in Mass Storage mode. If you see MTP instead of Mass Storage, change the USB mode in the camera settings.

Wait. Within about 5–7 minutes, I will inform you that the language has been unlocked. The camera may turn off and on multiple times during the process—this is normal.
Turn off the camera, disconnect it from the computer, and turn it back on. Done! Your language will now appear in the language selection menu. You’re amazing!


Leave a review on Avito or VK. Help others choose a reliable service provider. 😉
How to Change USB Connection Mode
We need the connection mode to be Mass Storage (Image Transfer, MSC), but sometimes the camera defaults to a different mode, such as MTP. Follow these steps to change the mode manually:
Disconnect the camera from the computer.
Change the setting in the camera menu.

Reconnect the camera to the computer and ensure the connection mode is now Mass Storage (or Image Transfer).
Payment
You can see the payment options here
Payment is made before the procedure. Unfortunately, there have been cases where clients “forgot” or stopped responding after the service. Check out the reviews. If still in doubt, feel free to contact me.
Discounts are available for businesses.
Have more questions? Check out the FAQ.